Saturday, December 31, 2011

Folksy Flannels

It's done! It's done! And the cat has claimed it as her own, so I know it was a success. I was a little iffy on flannel for a quilt, especially a double layer, but it worked out wonderfully. It is warm and cosy, and so what if it's a cat fur magnet? It really is the perfect winter quilt.


I started this some time last year, which is how most of my projects go. I'm slow, what can I say? I ran into some little snags along the way, like cutting out all the squares and arranging them and not liking the result at all.


After sitting on it a while, I decided to split up the colours. Pink/yellows on one side, blues/greens on the other.


I also misjudged how wide I could make this thing before I ran out of fabric, so my seam ripper got a little work out. This also happened a lot..


 And then the binding went on, which was a pain because I am awful at making binding and sandwiching the quilt properly. This time I serged around the edges of the quilt, and basted the binding on to make sure I'd catch both sides with my seams. It helped.


Now, I get to curl up under this soft, warm quilt and enjoy it..well, when the cat hasn't plopped herself atop it, that is.

Sunday, December 25, 2011

Merry Christmas..

and Happy Holidays to all!


Friday, December 23, 2011

Walnut Shell Ornaments

A few years back I made these walnut shell ornaments. I made a couple more this year and thought I would post a little tutorial.


You can really use any type of fabric for this. Even felt would work as long as it`s not to thick. I used cross stitch canvas just for the sake of convenience when stitching, as well as some linen fabric.

What you'll need:
-half of an empty walnut shell
-fabric (you'll want a piece that is quite a bit larger than the shell)
-a small bit of batting or wool roving (about twice the size of a cotton ball)
-hot glue gun
-string or decorative trim for hanging
-embroidery floss, seed beads, and/or anything you'd like for embellishment

*Christmas movie and mug of hot chocolate are optional, but highly recommended!


I started off by cross stitching a little gnome. If you're doing the same, you're going to want to make sure your design is smaller than the walnut shell. I really like Japanese cross stitching books for this - many have a variety of really cute, tiny motifs. That's where I found the squirrel, acorn, and hedgie.


1. Cut around your design (or cut your fabric) leaving a lot of room around the edges. You're going to stuff the fabric and tuck it into the walnut shell, so you'll need a lot of excess. You can add embellishments now, or you can wait until the end.


2. Fold your string or trim in half and secure it to the inside of the walnut shell using your glue gun. Watch your fingers! I always manage to burn myself.


 3. Roll your batting or roving between your hands to form a ball. Put it in the middle of the wrong side of your fabric and wrap the sides around it. You may want to make a small snip in each 'corner' to avoid a lot of awkward folds that form with heavier fabric. You'll have to play with it a bit to get it to look the way you want it to.


4. Put a little more hot glue inside your walnut shell, and stuff your fabric ball inside, making sure to tuck in all edges. You're going to have to play with it again to get it to look the way you want it to. If you don`t want it to pop out as much, just use less stuffing.


6. Add any embellishments you`d like, and enjoy!

Thursday, December 22, 2011

Holiday Treat Making


My cousin joined me for some baking and holiday treat making. We get together every year just before the holidays to make our favourite recipes, and try some new ones to add to the ever growing list. We make way too many and package them up for gifts and holiday party treats. This year we made three - gingerbread cookies, peanutbutter and jelly cookies, and peppermint bark.


The gingerbread and pbj are both old family favourites with some tweaks to the recipes from my cousin's cookie book. The pbj were definitely the winner since we accidentally overcooked the gingerbread just a bit.


Our new recipe for the year was this incredible peppermint bark. The recipe is from orangette. I couldn't find the chocolate suggested, so I used another brand, making sure to match the percentages and ingredients. It is delicious and is going to be made again next year.


At this point we stopped for a Hannukah treat - Latkes!


I was so glad to share this day and tradition with my cousin, and am excited to share our treats with our friends and family.

Tuesday, December 20, 2011

Quilt Therapy


At this point in our infertility journey, there is a lot of discomfort and pain along with a lot of waiting. Distractions are very welcomed, especially when the pain management I am allowed to use does not do much to help. Lately I havve been finding comfort and relief in parts of the crafting process I normally find to be quite tedious - ironing, tracing, cutting, hand stitching. I love picking out fabric and I love putting projects together, but the parts inbetween are really not my favourite.


For now, the repetition, handwork, and 'slowness' is therapeutic, and so I chose to start a project that would provide lots of it - a hexagon quilt. I have seen many hexagon quilts around and have always loved them, but the amount of work and time involved always scared me away. Not anymore!


I'm using three inch hexagons, so I imagine this will be a very time consuming project, but that`s okay. It`s the process here that is the important part. The finished product will be the icing on the cake. 


Right now, I am turning something difficult into something beauitful. Pain and discomfort into something productive. A type of art therapy. It is not a perfect solution, but it does help when I have the time to sit down and craft.

I am hoping that we come to the end of our journey long before I am able to finish it.

Sunday, December 18, 2011

A Different Sort of Tree


We would love to have our own woods one day, but for now we have one lonely apple tree. We (Jer and I), came up with an idea for a project that would involve a piece of a fallen tree. We asked friends and family and inquired in our community, and were invited out to a beautiful piece of land where a lovely couple were clearing fallen trees and would be happy to have us haul away a piece of one of them. With warm boots, winter woolens, and a saw, we headed out there to choose the perfect piece.


We were greeted by Mika the dog, who ran about and happily invited us to play. L took us on a tour of her property, proudly showing us all the work they had done and all the wood we could choose from, and introduced us to her husband who was already out back, chopping wood for the fireplace.

We picked out two good sized Spruce logs that were nice and dried out, perfect for what we want them for. L also welcomed us to collect any pieces of birch bark that had fallen off the trees. I left with a nice handful. I'm not quite sure what I will do with it yet.


One day I hope to own a property with beautiful woods like these, but for now I am grateful to those who are willing to share a little bit of theirs with us.

Saturday, December 17, 2011

Handmade Holidays


I think it's probably pretty obvious by now, but let's let that cat out of the bag, shall we? I love Christmas. LOVE. I have so many wonderful memories centered around this time of year, most of spending special time with loved ones. The actual holiday itself I could give or take, I do have fun making and choosing gifts for others, but I could easily let that part go, it's the build up full of special events, memories, and days that I love.

Another thing I love? All of the adorable Christmas crafts floating around. Have you seen Hillary's yearly Christmas crafts? The woman is a genius! I have been stockpiling links to tutorials and patterns for years, but rarely ever have time to make them. This year has been different. I have been a crafting machine! I blame this on waiting to get the results of our IUI on Monday. I need distractions, and I need to keep my hands busy.

The adorable Santa and Snowman up there are courtesy of The Small Object. I haven't found any little sleds for them to ride around in, but I think they are so sweet just as they are, if not a little wobbly. They are inspired by the gorgeous vintage hand-spun cotton ornaments. These are done with cotton balls, glue, hairspray, and a lot of patience and handwashing to keep the glue off while smoothing and shaping over and over again. I completed these over several days while each layer of cotton dried. I was also missing a fuzzy white pipeclear for Santa's beard, so I improvised with some felt...and he also has polka dots because I didn't have enough plain red fabric. Whatever, I'm sure he doesn't mind.


This was another that had been on the list for a while. It's a miniature Elsa/Elise elf from Hillary's pattern. I made the full sized version a couple years ago, but had to make one for my tree. You just shrink the pattern to your desired size and get sewing. My only qualm with this pattern is that no matter how precise I cut out the head, it always ends up looking a little square and light-bulby instead of the beautiful and round like in the pattern pictures. I wonder what I'm doing wrong.

Three more days of distractions needed. Maybe I'll finally finish those mittens I started knitting two years ago. 


Friday, December 16, 2011

Cat Toy Tutorial


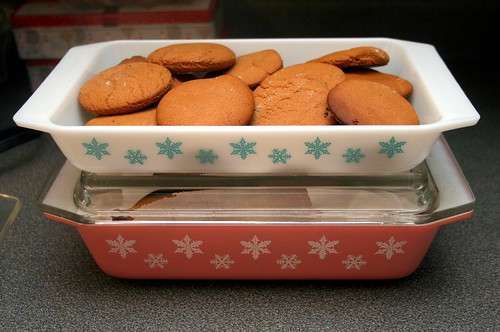
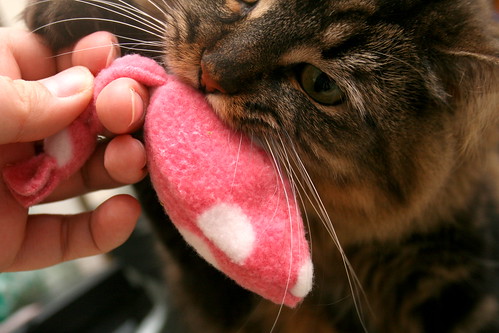
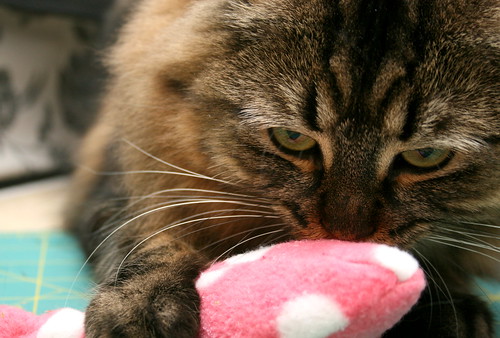
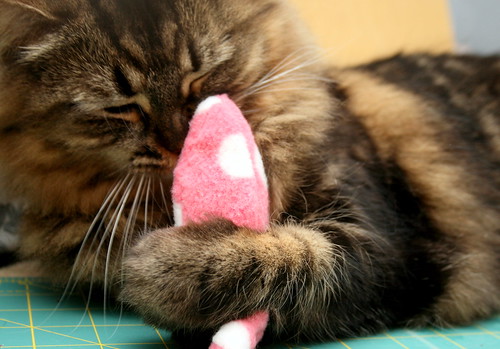
My old cat Snowie never liked toys. She was happiest with a cardboard box, a shelled almond to bat around, and a basket to curl up in. This cat? She loves toys. She likes to snuggle them, carry them around in her mouth, and chase them around. Her previous mice toys have gone missing, and since they were rather worn and a little gross anyway, I wanted to get her some new ones. Cats need holiday gifts too! Instead of buying, I decided to make some for her using the stack of fleece scraps I had on hand from making bedding, hammocks, and tubes for the chinchillas.

I like using fleece for my animals, mostly because it doesn't release threads when it gets worn. I also stuff with fleece so that if the toy rips open, my animals aren't swallowing pieces of fluffy batting. This pattern would work with any type of fabric though, you'd just have to keep a closer eye on the toys to make sure they aren't falling apart.

You can find the pattern pieces here. Click on 'actions', then 'view all sizes'. the large setting is about the size I used.

You will need:
-enough fleece for the pattern pieces and to stuff the toy
-cat nip (I got a small tube with a cardboard scratcher, but you can find this in any pet store)
-sewing machine and/or needle and thread
-a cat friend to enjoy your creation


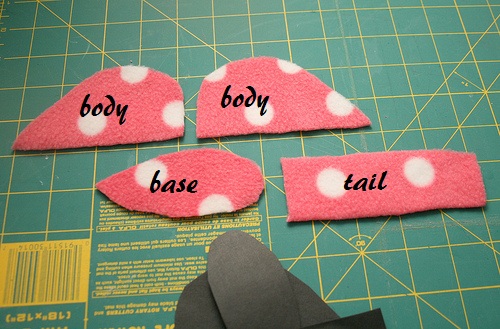
1. Trace the pattern pieces onto your fleece. Make sure you flip the body when making the second piece. You`re going to be sewing them right sides together.


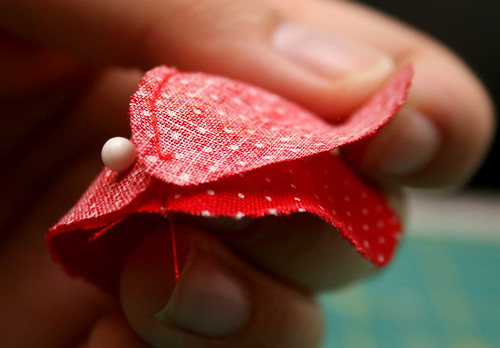
2. Tie a knot in your tail towards one end. The tail piece should naturally fold itself in half here, which is what you want. Sandwich the tail, knot facing inwards, between your two body pieces. You are going to lay your body pieces right sides together (the tail will be sandwiched between the right sides.
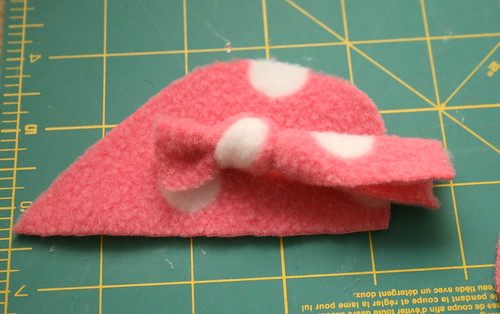
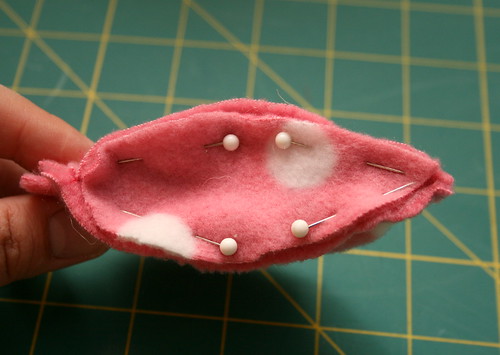
Pin and sew around the arch, leaving a 1/4" seam allowance.


You should have something that looks like this.


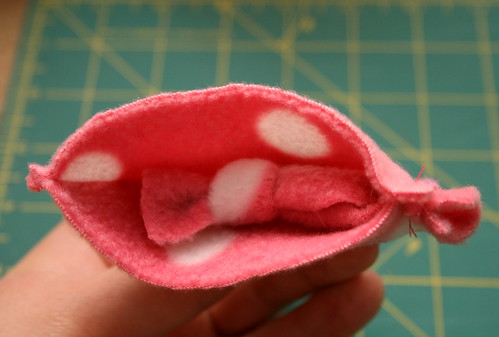
3. Fit your base piece into the bottom of your body, right side facing inward. You may find it easier to baste instead of pin, but whatever works for you. You're going to sew all the way around, leaving a 1.5 to 2 inch gap along one of the sides. This is how you'll turn your mouse right side out and stuff it.


4. Turn your mouse right side out and stuff it with your scrap fleece.


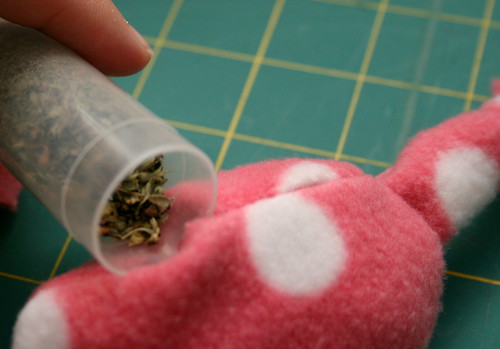
5. Add your catnip. I like to put about half the stuffing in, add the catnip, and then stuff the rest of the way. 


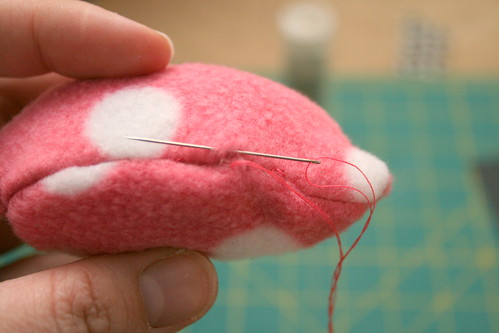
6. Close the opening with an invisible stitch, and you're done. Repeat for all the kitty friends in your life!


Thursday, December 15, 2011

Fabric Mushroom Ornament Tutorial

I saw some adorable fabric mushroom ornaments on IKEA's website, but by the time I got to the store they were gone. I checked two other locations (yes, you read that right, I have three IKEA stores within 30 minutes of my home), and even though they assured me on the phone they had them and would hold some for me, they had none when I arrived. I was sad that I wouldn't be adding these cute mushrooms to my tree, but then I realized how easy it would be to make them myself. I even had some red with white polka dot fabric in my stash!


I thought I'd share the process in case you wanted to make some of your own.


You will need:

-a sewing machine and/or needle and thread

-thread to match your mushroom cap and stem fabric

-red fabric for the mushroom cap

-linen fabric for the stem (you could also use white or whatever fabric you have on hand..these would definitely work with felt)

-a white fabric pencil to mark out the shape

-scissors


optional - white embroidery floss to make french knots on the mushroom caps

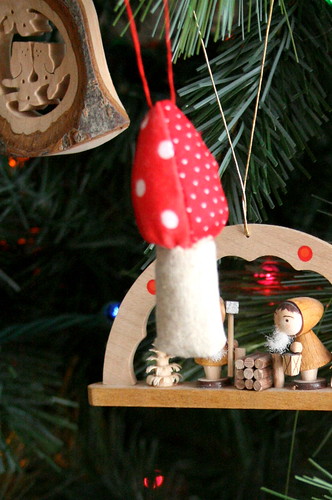
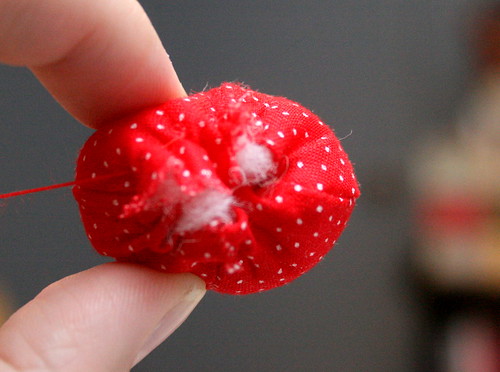
1. Cut out four tear drop shapes. These are going to be the cap of your mushroom. If you want a taller, thinner cap cut the pieces narrower and longer. These pieces I have here make more of a round cap. The size you make will depend on how big you want your finished mushroom. Each of my tear drops is about 1.5 inches wide and three inches high. The finished mushroom, including the stem, is four inches.


I had red fabric with white polka dots on hand, but you could use plain red and add dots with embroidery floss and french knots.

2. Pin the pieces wrong sides together. You'll have two of these since you have four pieces. Leaving a 1/4" seam allowance, sew where I have drawn the blue line. You're going to sew a little past the middle point on the top, and a little before on the bottom. You're going to be leaving an opening at the bottom to stuff the mushroom cap.

3. Open up each side of your mushroom cap. You're going to place these right sides together. They're sewn on a curve, so they create a bit of a 'boat' shape. You're going to nest one inside the other.


4. Pin together, and leaving a 1/4" seam allowance, sew around the area I have indicated with a blue line. Leave the space at the very bottom open.


Go ahead and turn your work right side out. You can now stuff it. I used cotton batting, but you can use whatever you have on hand, including fabric scraps.
5. You're going to sew around the bottom of the mushroom cap, weaving the needle in and out as I have shown. Go around the entire cap. Make sure to double your thread as you'll need it to be quite strong.


6. Pull your thread tight so the hole closes. This also brings the edges in creating the mushroom cap shape. It's not necessary, but what worked best for me was creating a little knob with the fabric ends. You can place the stem over this so it covers all the 'mess'.

Now put your finished mushroom cap aside. You're going to make the stem.


7. Cut a rectangle out of your linen fabric. The size will depend on how big or small you want your stem to be. I used a piece that was about 3.5 inches tall and about 3 inches wide. Fold your rectangle in half and sew around the top and side, leaving a 1/4" seam allowance. I used red thread so you could easily see, but it'd be best if you could use a thread that matches your fabric. Snip the corners and turn your stem right side out. Now you can stuff your stem.


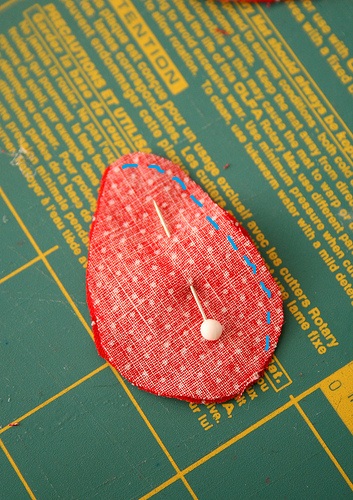
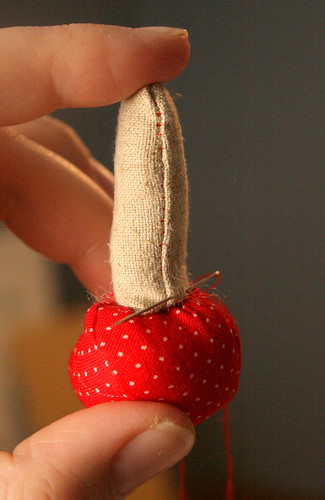
8. Place your stem on the bottom of your mushroom cap, over the little knob you made (if you did make one). You're going to sew the cap and the stem together using a hidden stitch. To make sure it stays in the right place, you may want to make one stitch holding the stem to the cap on each side before you sew all the way around.

Hopefully my terrible paint drawing helps illustrate the stitch you'll use. The black is the stitching you're going to do. Red is the mushroom cap, beige is the stem. You're going to pull the stitches tight though.


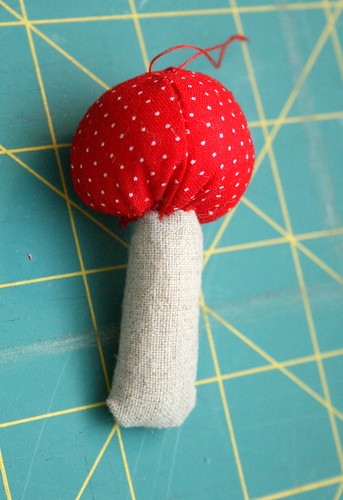
9. Once you tie off, sew a bit of thread through the top of your mushroom cap to hang your ornament from the tree. And you're done!

These are so quick and easy to make, you're going to want to make a whole army for your tree!