
 I saw some adorable fabric mushroom ornaments on IKEA's website, but by the time I got to the store they were gone. I checked two other locations (yes, you read that right, I have three IKEA stores within 30 minutes of my home), and even though they assured me on the phone they had them and would hold some for me, they had none when I arrived. I was sad that I wouldn't be adding these cute mushrooms to my tree, but then I realized how easy it would be to make them myself. I even had some red with white polka dot fabric in my stash!
 1. Cut out four tear drop shapes. These are going to be the cap of your mushroom. If you want a taller, thinner cap cut the pieces narrower and longer. These pieces I have here make more of a round cap. The size you make will depend on how big you want your finished mushroom. Each of my tear drops is about 1.5 inches wide and three inches high. The finished mushroom, including the stem, is four inches.
I had red fabric with white polka dots on hand, but you could use plain red and add dots with embroidery floss and french knots.
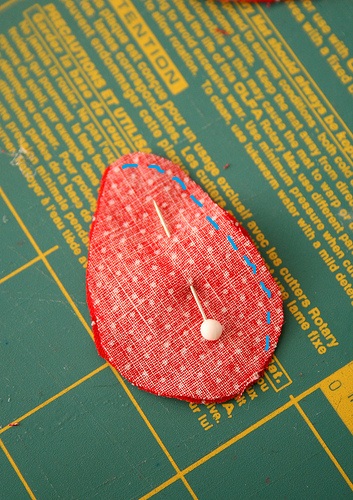 2. Pin the pieces wrong sides together. You'll have two of these since you have four pieces. Leaving a 1/4" seam allowance, sew where I have drawn the blue line. You're going to sew a little past the middle point on the top, and a little before on the bottom. You're going to be leaving an opening at the bottom to stuff the mushroom cap.
 3. Open up each side of your mushroom cap. You're going to place these right sides together. They're sewn on a curve, so they create a bit of a 'boat' shape. You're going to nest one inside the other.
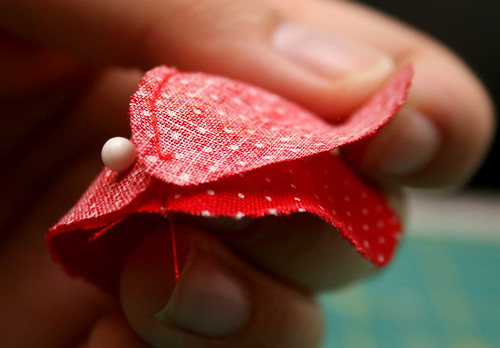
 4. Pin together, and leaving a 1/4" seam allowance, sew around the area I have indicated with a blue line. Leave the space at the very bottom open.
 5. You're going to sew around the bottom of the mushroom cap, weaving the needle in and out as I have shown. Go around the entire cap. Make sure to double your thread as you'll need it to be quite strong.
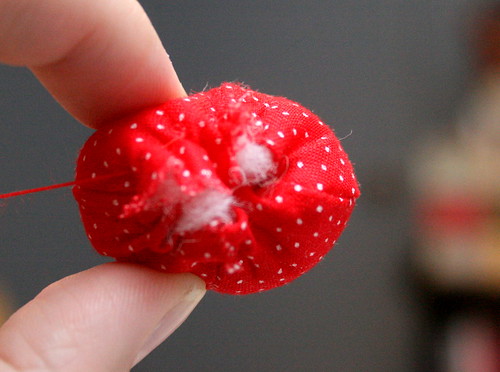 6. Pull your thread tight so the hole closes. This also brings the edges in creating the mushroom cap shape. It's not necessary, but what worked best for me was creating a little knob with the fabric ends. You can place the stem over this so it covers all the 'mess'.
 Now put your finished mushroom cap aside. You're going to make the stem.
 7. Cut a rectangle out of your linen fabric. The size will depend on how big or small you want your stem to be. I used a piece that was about 3.5 inches tall and about 3 inches wide. Fold your rectangle in half and sew around the top and side, leaving a 1/4" seam allowance. I used red thread so you could easily see, but it'd be best if you could use a thread that matches your fabric. Snip the corners and turn your stem right side out. Now you can stuff your stem.
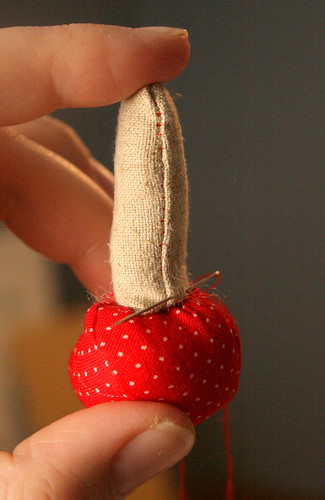 8. Place your stem on the bottom of your mushroom cap, over the little knob you made (if you did make one). You're going to sew the cap and the stem together using a hidden stitch. To make sure it stays in the right place, you may want to make one stitch holding the stem to the cap on each side before you sew all the way around.
 Hopefully my terrible paint drawing helps illustrate the stitch you'll use. The black is the stitching you're going to do. Red is the mushroom cap, beige is the stem. You're going to pull the stitches tight though.
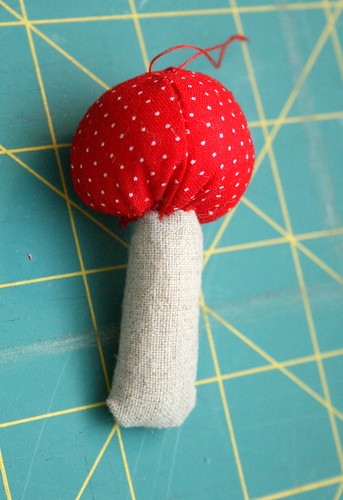 9. Once you tie off, sew a bit of thread through the top of your mushroom cap to hang your ornament from the tree. And you're done!
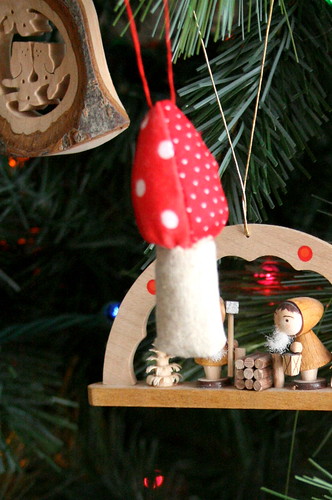 These are so quick and easy to make, you're going to want to make a whole army for your tree!
1 comment:
ray ban sunglasses
miami heat jersey
abercrombie and fitch
asics running shoes
replica watches
air jordan shoes
cheap nfl jerseys
puma sneakers
miami dolphins jerseys
gucci outlet
ugg outlet, http://www.uggsoutlet.us.org
michael kors outlet online
roshe run men
michael kors outlet, http://www.michaelkorsoutletcanada.in.net
burberry outlet
tiffany jewelry
cheap oakley sunglasses
ray ban sunglasses, http://www.ray-bansunglassess.in.net
atlanta falcons jersey
kate spade outlet
true religion outlet, http://www.truereligionjeansoutlet.com
burberry outlet online
snapback hats
cheap nhl jerseys
timberland boots
tiffany and co jewelry
jordan 11
cheap football shirts
nfl jerseys wholesale
futbol baratas
cheap mlb jerseys
boston celtics jersey
adidas shoes
north face jackets
kate spade outlet
2015827caihuali
Post a Comment