
 Last year I sewed up a few tote bags as holiday gifts. One went to someone who had given many handmade gifts to others. When she saw the little bag, she was almost moved to tears. Not because it was any great present, but because even though she had made gifts for others, nobody had ever made a gift for her and she knew how special it was to think of someone while you carefully put together a gift for them.
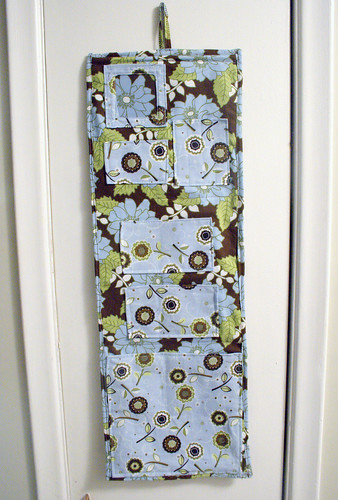
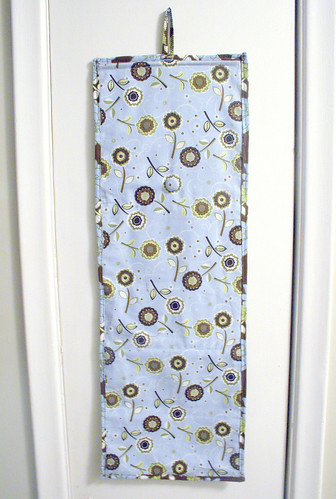 I used two cotton fabrics in contrasting colours. I don't remember the designer or name, but I picked it up from my local fabric shop. I made up the pattern as I went along. Two long rectangles of fabric for the front and back, and assorted rectangles in the contrasting fabric for the pockets. Everything with a layer of interfacing (pockets & body pieces) to keep things sturdier. I did finish the edges on all the pieces of fabric before sewing them on to the background. It wasn't strictly necessary, but I found it much easier not having to worry about keeping all the edges even while sewing everything together.
 The picture frame is just a square of fabric with a smaller square cut out in the center (inner edges folded under by making a snip in each corner). I sewed a thin piece of clear plastic to the back to protect the photo. The top edge is not sewn down, so the photo can be changed. The pocket to the right has a few lines of lengthwise stitching to hold pens in place.
The binding came next, and was a pain! I had never made my own binding or worked with binding before (I had started it on an unfinished project, but that remains unfinished). The binding and stitching around it are uneven in places, but I guess I can't expect to be perfect on the first try!

I had a lot of fun making this project, and definitely learned a few new things. It's something that could really be played around with a lot...different sizes of pockets, layered pockets, velcro, zippers, hangers, magnets...there is just so much that could be changed. If anyone wants to give it a try and would like more detailed instructions, I would be happy to share.
8 comments:
that bag would be absolutely terrific as one of those hanging travel bags!
i recently decided to take up sewing so i picked up a sewing machine at my local thrift store. unfortunately, the last time i used one was in the 7th grade, so i'm having quite a bit of trouble. maybe one day i'll be advanced enough to make something as adorable as that bag =)
This would make a great gift for my sis and mother in law - both of whom are teachers.
I've only recently started sewing, after my mom in law gifted me one of her sewing machines and I really like to make cute (and easy) things like this.
Thank you for posting this :)
Sophie van der Walt
BTW I'm all the way from Pretoria, in South Africa :)
Thanks for the lovely comments! I think I will have to put together a tutorial for this one day soon. I really just winged the whole thing. I'm glad it has inspired you to get sewing :)
I love this!
This would be perfect for my sister. She gets a locker at the hospital she works at and this would be awesome for her to keep her stuff in check. If you ever get around to making a tutorial, I'd love to see it :D
ray ban sunglasses
miami heat jersey
abercrombie and fitch
asics running shoes
replica watches
air jordan shoes
cheap nfl jerseys
puma sneakers
miami dolphins jerseys
gucci outlet
ugg outlet, http://www.uggsoutlet.us.org
michael kors outlet online
roshe run men
michael kors outlet, http://www.michaelkorsoutletcanada.in.net
burberry outlet
tiffany jewelry
cheap oakley sunglasses
ray ban sunglasses, http://www.ray-bansunglassess.in.net
atlanta falcons jersey
kate spade outlet
true religion outlet, http://www.truereligionjeansoutlet.com
burberry outlet online
snapback hats
cheap nhl jerseys
timberland boots
tiffany and co jewelry
jordan 11
cheap football shirts
nfl jerseys wholesale
futbol baratas
cheap mlb jerseys
boston celtics jersey
adidas shoes
north face jackets
kate spade outlet
2015827caihuali
nfl jerseys
cheap ugg boots
carrera sunglasses
polo ralph lauren
ugg boots
moncler jackets
scarpe hogan
true religion jeans
air jordan 14
coach outlet
201710.25wengdongdong
Is there a tutorial available for this project?
Post a Comment